Hardtop Type: Truck Lids | Tonneau Covers | Truck Bed Covers
Truck Model: Chevy | Dodge | Ford | GMC | Isuzu | Nissan | Toyota
RALLY TOPS INSTALLATION INSTRUCTIONS
General Safety Information:
Carefully read all the instructions prior to attempting to fit the lid. Before fitting the lid, park vehicle on level ground in a well lit area and apply the emergency brake.
After installation, check that the lid works correctly and lock it securely. Periodically check all fasteners for tightness. Retighten only loose fasteners.
When using power or hand tools, always wear the correct protective clothing and eye protection recommended by the tool manufacturer.
Always open the truck lid fully before reaching into the truck bed. The truck lid may accidentally close on you if the truck lid is not gully open.
Always have the truck lid closed and locked while the truck is in motion or being towed. The wind draft may force the truck lid open and may disengage from the vehicle.
Never place or install small items on top of the truck lid.
Instructions:
Read the instructions prior to installing or operating the lid. SEVERE INJURY can result if you do not follow these instructions and warnings.
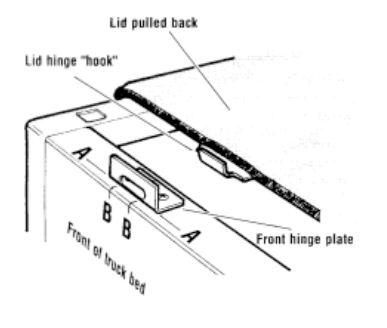
1. Marking for the front plates.
With the assistance of another person, position lid on truck bed. The lid should fit square and be evenly spaced about the truck. The rear of the lid should stick out about 1/4” to 1/2” away from the tailgate. DO NOT PUSH LID UP AGAINST THE TAILGATE. Using the hinges in the lid, mark with a pencil, the position for the hinge plates. The “A” marks will determine the fore and aft positioning. The “B” marks determine the lateral positioning of the lid.
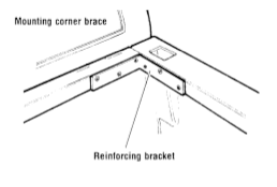
2. Mounting corner brackets.
The front of the bed has to be reinforced with the brackets from the kit. Position one of the brackets as shown in the diagram, using the bracket as a guide, drill 6, 1/8” holes. Repeat for other side. Attach the brackets using the 3/4” flat head sheet metal screws from the kit.
3. Mounting front hinge plates.
Slide the lid back about 2 feet. Line up the hinge with the marks as shown in diagram. Using the hinge plate as a guide. Drill a 1/8” hole in the middle of the elongated holes of the hinge plate. Caution: Make Sure the Hinge Plates Do Not Move While You Are Drilling These Holes. Using the 5/8” round head sheet metal screws, attach both hinge plates to the bed.
4. Attaching lid to hinge plates.
With the assistance of another person, lift the rear of the lid and slide it forwards, so that the lid hinges hook and engage the hinge plate slots. Check the fit, remove the lid and make adjustments if needed. Then drill the outer holes in the hinge plate and install screws to secure thebracket to the bed.
5. Mounting shock brackets.
Lift the lid at the back and open the tail gate and then lower the lid to the closed position. With a flashlight, crawl into the truck bed and mark the location of the center of the ball shock bracket on the lid. Now measure BACK from that mark 18” and mark the truck rail at that point. Using the lower shock bracket as a template. Drill 2 each, 3/16” holes, ensuring that the center of the ball shock, is at the marked position. Mount the lower shock brackets using the self tapping sheet metal screws supplied. Attach the lift shocks to the brackets (they will snap into place over the ball part of the brackets). With the assistance of another person, lift the lid to the open position and snap the lift shocks into the brackets on the lid.
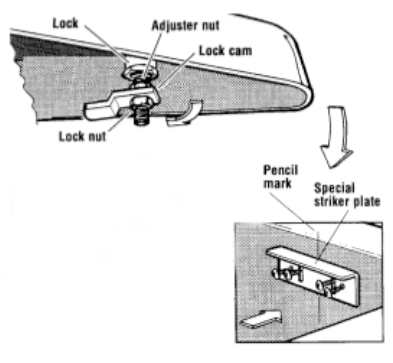
6. Mounting the lock striker plates.
Open the tailgate, lower the lid with the locks in the unlocked position. When the lid is down, turn the locks to the locked position. Use a pencil to mark the center of the lock cam on both sides of the truck bed. Unlock the locks and raise the lid. Attach the striker plates to the sides of the bed with the 5/8 sheet metal screws. The center of the plate aligning with the center of the pencil mark. With the tailgate still open, lower the lid with the locks in the unlocked position. Turn the locks to the locked position and adjust the lock adjuster nut, so that the lock cam exerts a small amount of pressure on the striker plate. Using the two wrenches, cinch up the lock nut on the lock. Repeat on the other side. Unlock and open the lid.
WARNING: The locks must always be in the unlocked position before closing the lid. Failure to do this will result in scratched paint and damage locks.
7. Check all fasteners.
Check that all fasteners are secure and that the lid operates correctly. Check that the locks securely hold the lid in position. Make sure when the lid opens and closes, it does ot scrape against any of the vehicle’s body work.
LID REMOVAL:
This lid is designed to be easily removed. With the lid open, detach the shock ends from the shock brackets (see diagram). With the help of another person, continue lifting the lid until it detaches from the front hinge brackets. Removing Lift Shocks from Shock Mounts Using a screwdriver blade, lift the spring clip away from the shock end (Do Not totally remove clip). Pull shock end away from the shock mount and release the spring clip.
Need more help?
Installing your Rally Top sport truck hardtop is a simple process, but we are always ready to lend expert advice.


